开发者指南
开发者指南
相关源文件
本章引用的主要源码文件:
.github/workflows/argilla-frontend.build-push-dev-frontend-docker.yml.github/workflows/argilla-frontend.deploy-environment.yml.github/workflows/argilla-frontend.yml.github/workflows/argilla-server.yml.github/workflows/argilla-v1.yml.github/workflows/argilla.docs.yml.github/workflows/argilla.yml.github/workflows/close-inactive-issues-bot.yml.gitignore.pre-commit-config.yamlargilla-frontend/dev.frontend.Dockerfileargilla-frontend/package-lock.jsondocs/_source/_common/tabs/argilla_install_python.mddocs/_source/community/contributing.mddocs/_source/community/developer_docs.mddocs/_source/community/migration-rubrix.mddocs/_source/getting_started/installation/deployments/docker.mddocs/_source/getting_started/installation/deployments/docker_compose.mddocs/_source/getting_started/installation/deployments/python.mddocs/_source/reference/cli.mddocs/_source/reference/notebooks.rstdocs/migration-rubrix.mddocs/template.ipynb
目的与范围
本指南为希望贡献或扩展 Argilla 代码库的开发者提供技术文档。内容涵盖开发环境搭建、仓库结构、贡献工作流以及持续集成/持续部署(CI/CD)管线。
详细的环境搭建说明请参见开发环境搭建,贡献指南请参见贡献工作流,CI/CD 详情请参见CI/CD 管线。
仓库结构
Argilla 采用单体仓库(monorepo)结构,包含以下几个关键组件:

来源:docs/_source/community/developer_docs.md:34-39
仓库的组织方式如下:
argilla/:包含用于与 Argilla 服务器交互的 Python SDKargilla-server/:包含 FastAPI 服务器实现argilla-frontend/:包含 Vue.js 用户界面argilla-v1/:包含遗留 API(用于向后兼容)docs/:包含文档文件examples/:包含示例部署、脚本和笔记本
开发环境搭建
下图展示了完整开发环境所需的组件:
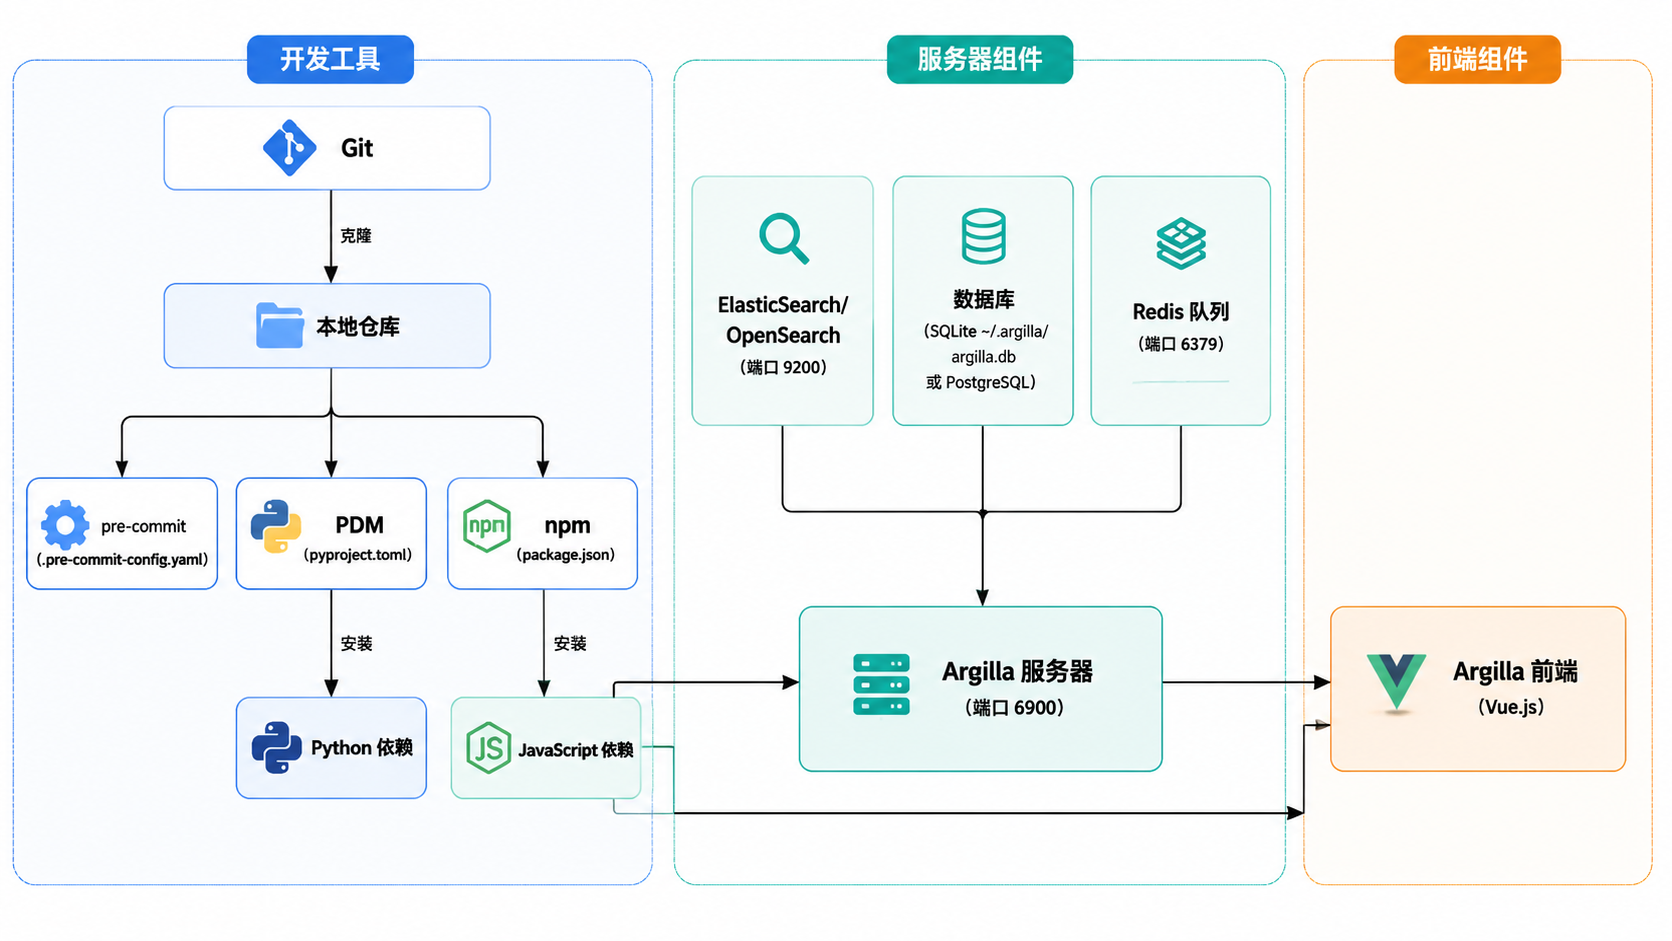
来源:docs/_source/community/developer_docs.md:152-246、.pre-commit-config.yaml:1-96
前提条件
- Git
- Python 3.9+
- Docker(用于数据库和前端开发)
- Node.js(用于前端开发)
Python 环境搭建
你可以使用 pip 或 conda 搭建 Python 环境。
使用 pip
cd argilla
python -m venv .env
source .env/bin/activate
pip install -e ".[server,listeners,postgresql,integrations,tests]"
使用 conda
conda env create -f environment_dev.yml
conda activate argilla来源:docs/_source/community/developer_docs.md:176-246
代码格式化工具
Argilla 使用 pre-commit 钩子来确保代码格式的一致性:
pip install pre-commit
pre-commit install
这会在每次提交前自动对代码运行格式化工具和检查工具,确保代码符合项目的风格指南。
来源:docs/_source/community/developer_docs.md:248-261、.pre-commit-config.yaml:1-96
数据库设置
Argilla 需要:
- 一个向量数据库(Elasticsearch/OpenSearch)
- 一个关系型数据库(SQLite/PostgreSQL)
- Redis 用于作业调度
向量数据库
使用 Docker 搭建 Elasticsearch:
docker network create argilla-net
docker run -d --name elasticsearch-for-argilla --network argilla-net \
  -p 9200:9200 -p 9300:9300 \
  -e "ES_JAVA_OPTS=-Xms512m -Xmx512m" \
  -e "discovery.type=single-node" \
  -e "xpack.security.enabled=false" \
docker.elastic.co/elasticsearch/elasticsearch:8.5.3来源:docs/_source/community/developer_docs.md:271-291、docs/_source/getting_started/installation/deployments/docker.md:8-46
关系型数据库
默认使用 SQLite(位于 ~/.argilla/argilla.db),但也支持 PostgreSQL。运行数据库迁移并创建默认用户:
# 运行数据库迁移
argilla server database migrate

# 创建默认用户
argilla server database users create_default来源:docs/_source/community/developer_docs.md:292-341、docs/_source/reference/cli.md:189-205
服务器和前端搭建
服务器搭建请参考 argilla-server/README.md,前端搭建请参考 argilla-frontend/README.md。
来源:docs/_source/community/developer_docs.md:343-351
贡献工作流
下图展示了典型的贡献工作流:
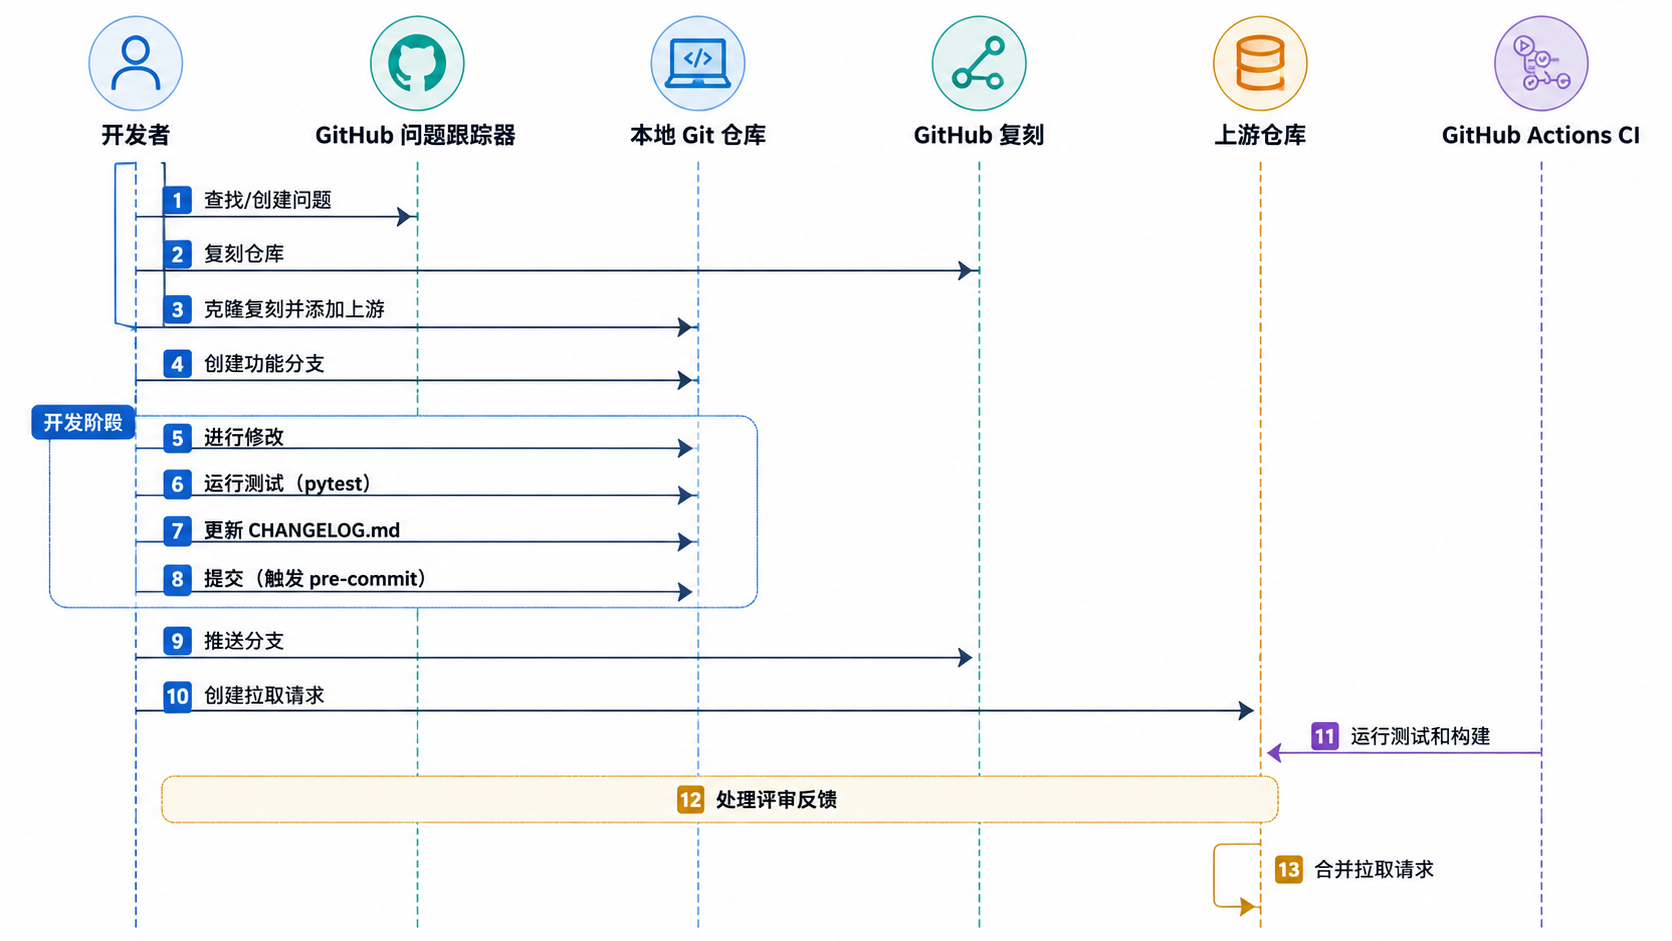
来源:docs/_source/community/contributing.md:36-211
问题报告
在进行修改之前,请检查是否已有相关问题,或使用 GitHub 上相应的问题模板创建新问题。问题有助于跟踪缺陷、功能请求,并确保工作不会重复。
来源:docs/_source/community/contributing.md:48-62
分支策略
从适当的基础分支创建分支:
main用于文档变更develop用于新功能、增强和缺陷修复
使用分支命名约定:
feature/用于新功能bug/用于缺陷修复docs/用于文档变更
来源:docs/_source/community/contributing.md:92-116
进行修改
在本地进行修改,确保遵循项目的代码风格指南。记得更新 CHANGELOG.md 文件,在相应的章节(新增、变更、修复等)下描述你的修改。
来源:docs/_source/community/contributing.md:117-164
测试
针对你的修改运行适当的测试:
# Python SDK 测试
pytest tests/unit       # 运行单元测试
pytest tests/integration  # 运行集成测试

# 服务器测试
pdm test test/unit
# 使用 PostgreSQL
ARGILLA_DATABASE_URL=postgresql://postgres:postgres@localhost:5432 pdm test tests/unit

# 前端测试
npm run test来源:docs/_source/community/developer_docs.md:361-401
创建拉取请求
将修改推送到你的复刻仓库,然后向上游仓库的相应分支创建拉取请求。请遵循拉取请求模板,并添加适当的标签。拉取请求标题应包含表示变更类型的前缀(feat:、bug:、docs:)。
来源:docs/_source/community/contributing.md:166-190
持续集成与持续交付管线
Argilla 使用 GitHub Actions 进行持续集成/持续部署(CI/CD)。下图展示了 CI/CD 管线架构:
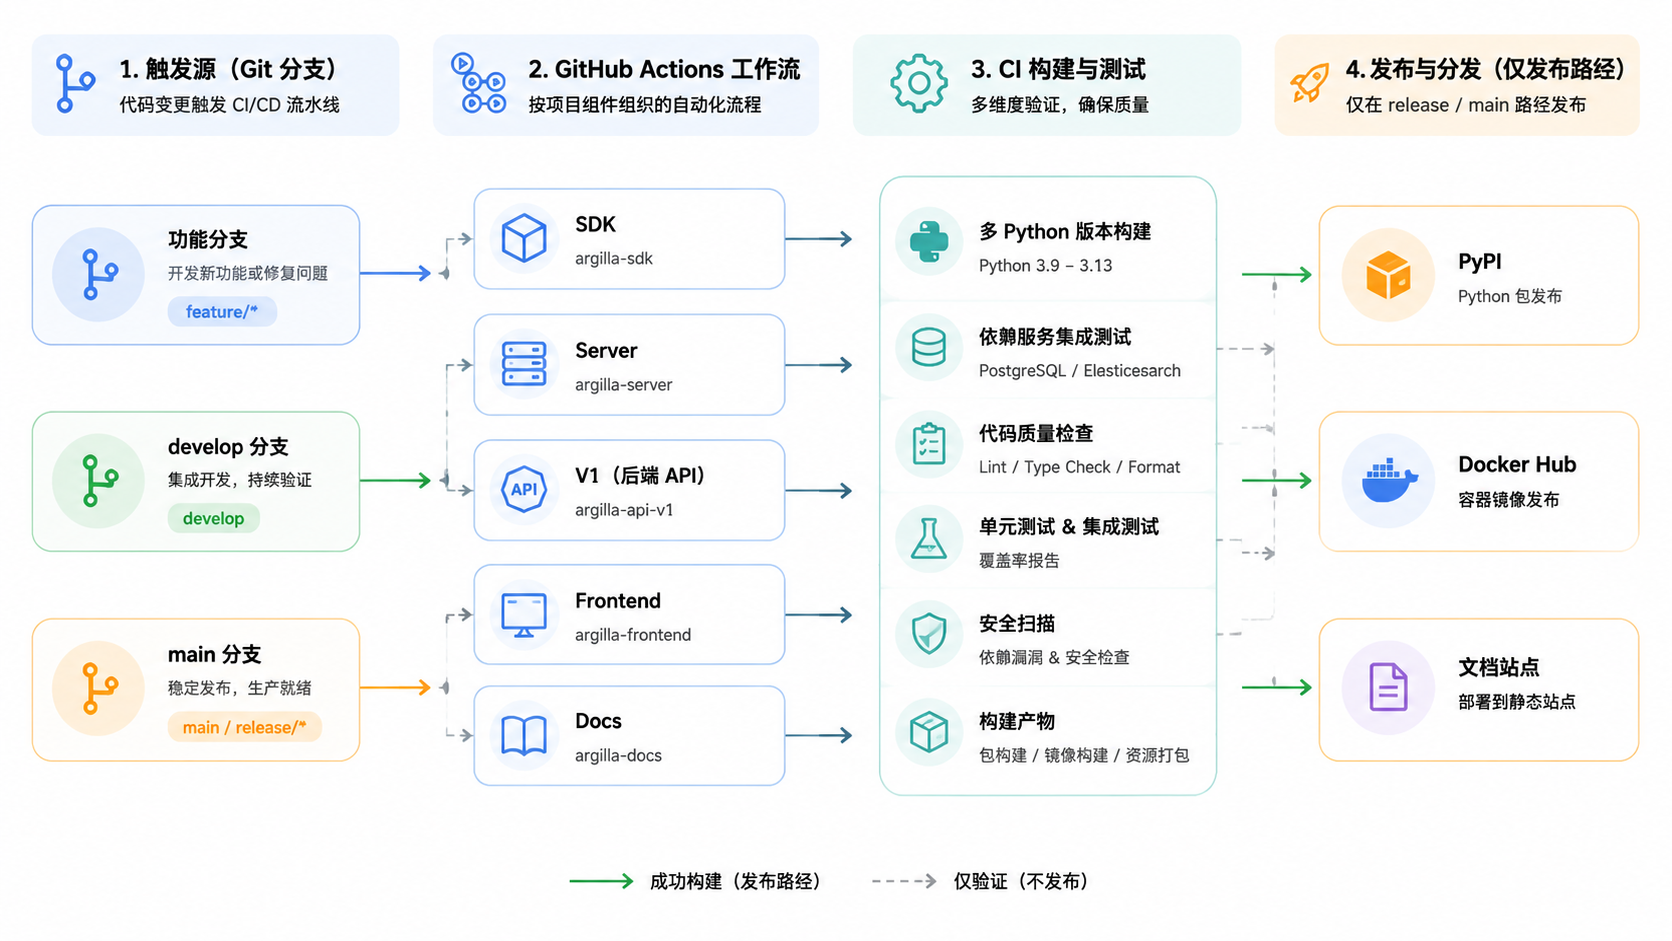
来源:.github/workflows/argilla.yml:1-138、.github/workflows/argilla-server.yml:1-203、.github/workflows/argilla-v1.yml:1-146、.github/workflows/argilla-frontend.yml:1-87、.github/workflows/argilla.docs.yml:1-109
关键工作流
- argilla.yml:构建并测试 Python SDK,在 main 分支上发布到 PyPI
- argilla-server.yml:构建并测试服务器,创建 Docker 镜像
- argilla-v1.yml:构建并测试遗留 API
- argilla-frontend.yml:构建并测试前端,创建开发 Docker 镜像
- argilla.docs.yml:构建并部署文档
每个工作流由特定事件(拉取请求、推送到特定分支)触发,并运行一系列作业来测试、构建和发布制品。
来源:.github/workflows/argilla.yml:7-14、.github/workflows/argilla-server.yml:7-19、.github/workflows/argilla-v1.yml:7-19、.github/workflows/argilla-frontend.yml:8-13、.github/workflows/argilla.docs.yml:7-17
CI 中的测试
测试在多个 Python 版本(3.9、3.10、3.11、3.12、3.13)上运行,并使用多种数据库配置,以确保跨环境的兼容性。
来源:.github/workflows/argilla.yml:43-68、.github/workflows/argilla-server.yml:84-91
包发布
当代码合并到 main 分支时,Python 包会发布到 PyPI。Docker 镜像会发布到 Docker Hub,包括服务器镜像和组合镜像。
来源:.github/workflows/argilla.yml:80-137、.github/workflows/argilla-server.yml:143-202、.github/workflows/argilla-v1.yml:98-146
常见开发任务
本地运行 Argilla
在本地运行所有组件:
# 启动 Elasticsearch(如果尚未运行)
docker start elasticsearch-for-argilla

# 运行数据库迁移
argilla server database migrate

# 启动服务器
argilla server start

# 在另一个终端中启动前端(参见 argilla-frontend/README.md)
cd argilla-frontend
npm run dev来源:docs/_source/reference/cli.md:177-186
数据库管理
# 重建数据库
rm ~/.argilla/argilla.db
argilla server database migrate

# 创建用户
argilla server database users create

# 列出用户
argilla users list

# 创建工作空间
argilla workspaces create my-workspace

# 列出数据集
argilla datasets list来源:docs/_source/community/developer_docs.md:328-341、docs/_source/reference/cli.md:70-169
处理问题
Argilla 使用一个机器人来自动关闭超过 90 天不活跃的问题。为防止这种情况,请确保及时回复你问题下的评论,并定期更新它们。
来源:.github/workflows/close-inactive-issues-bot.yml:1-29
最佳实践
代码风格
Python 代码遵循 PEP 8 风格指南。使用 pre-commit 钩子来确保格式的一致性。项目使用 Ruff 进行 Python 代码的格式化和检查。
来源:.pre-commit-config.yaml:11-26
提交信息
使用描述性的提交信息,并在适用时引用问题编号。添加适当的前缀来表示变更类型(feat:、bug:、docs:)。
来源:docs/_source/community/contributing.md:182-183
测试
为新功能和缺陷修复编写测试。项目使用 pytest 测试 Python 代码,使用 Jest 测试前端。
来源:docs/_source/community/developer_docs.md:361-401